
Look in to Award Winning Science projects
Automatic Fire Detection and Alarm System School Science Project – Amazing DIY Kit
Original price was: ₹999.₹699Current price is: ₹699. (incl. GST)Automatic Fire Extinguisher Science Project for School Students – DIY STEM Kit | ElectroComps
Original price was: ₹999.₹699Current price is: ₹699. (incl. GST)Automatic Gas Leakage and Alarm System School Science Project – Award Winning DIY Kit
Original price was: ₹999.₹699Current price is: ₹699. (incl. GST)Automatic Rain Detection and Alarm System School Science Project Kit – Amazing DIY Project
Original price was: ₹999.₹699Current price is: ₹699. (incl. GST)Automatic Smoke Detection and Alarm System School Science Project – Amazing DIY Kit
Original price was: ₹999.₹699Current price is: ₹699. (incl. GST)ESP32 AI Voice Assistant School Science Project – Powerful DIY STEM Kit
Original price was: ₹5999.₹2199Current price is: ₹2199. (incl. GST)Smart Irrigation Science Project Kit – Build Your Own DIY STEM Kit in 10 Easy Steps | ElectroComps.in
Original price was: ₹699.₹599Current price is: ₹599. (incl. GST)Smart Weather Monitoring Station School Science Project Kit
Original price was: ₹4999.₹999Current price is: ₹999. (incl. GST)Wireless Power Transmitter School Science Project – Amazing Tesla Concept DIY Kit
Original price was: ₹999.₹599Current price is: ₹599. (incl. GST)




1. What is this project?
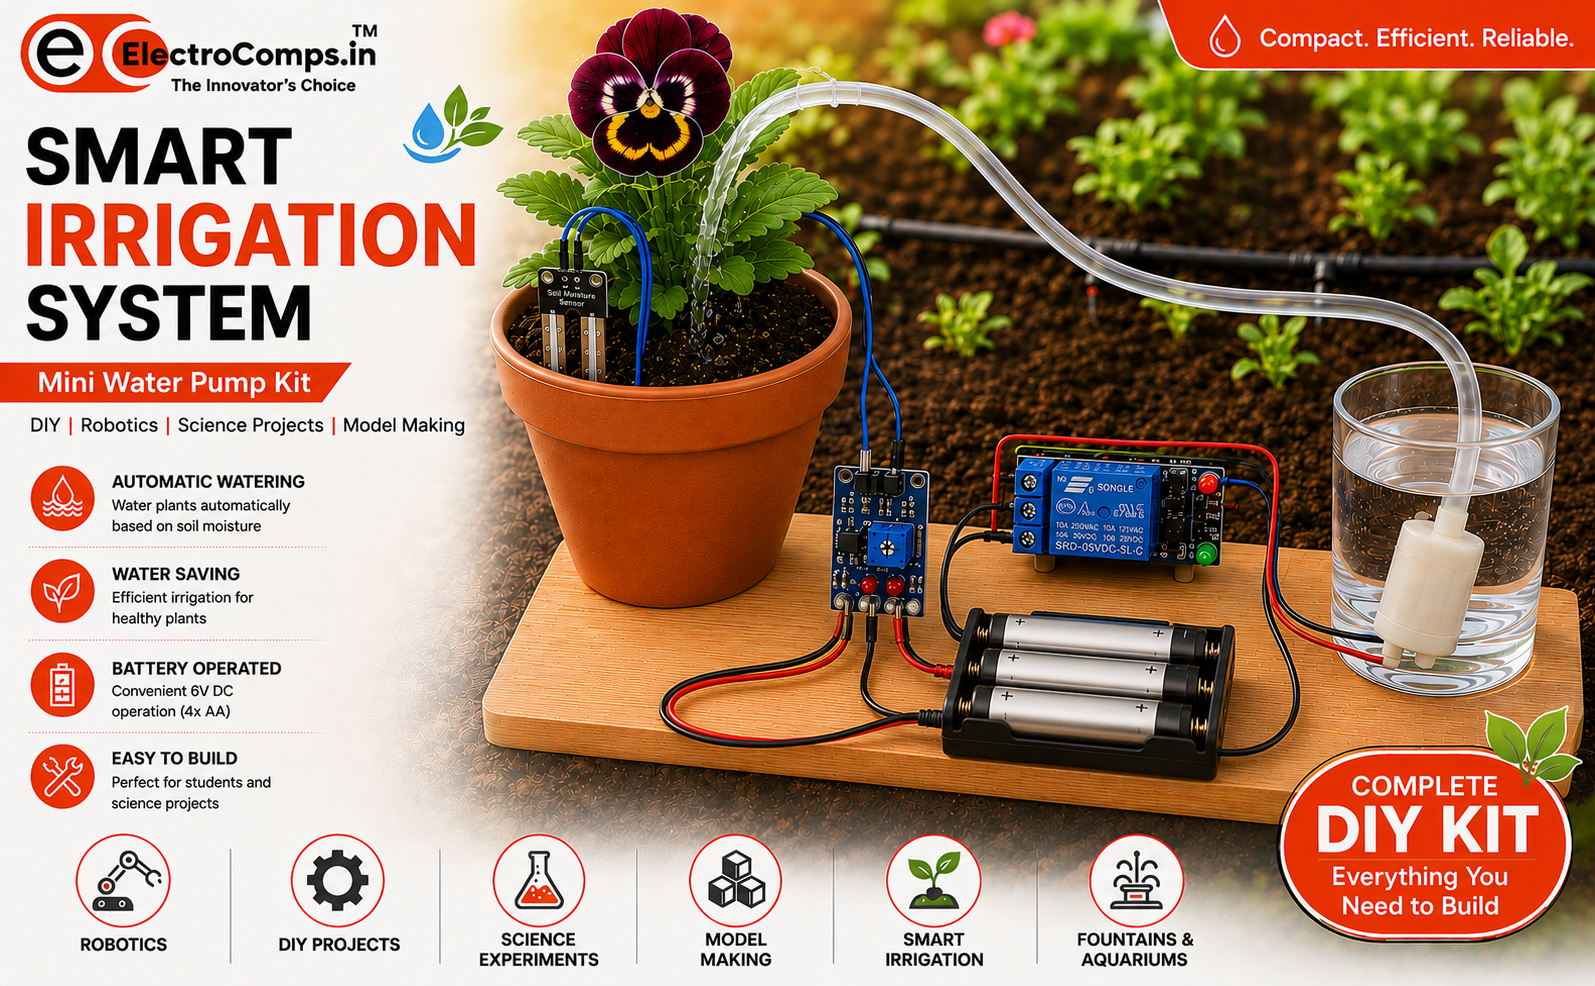
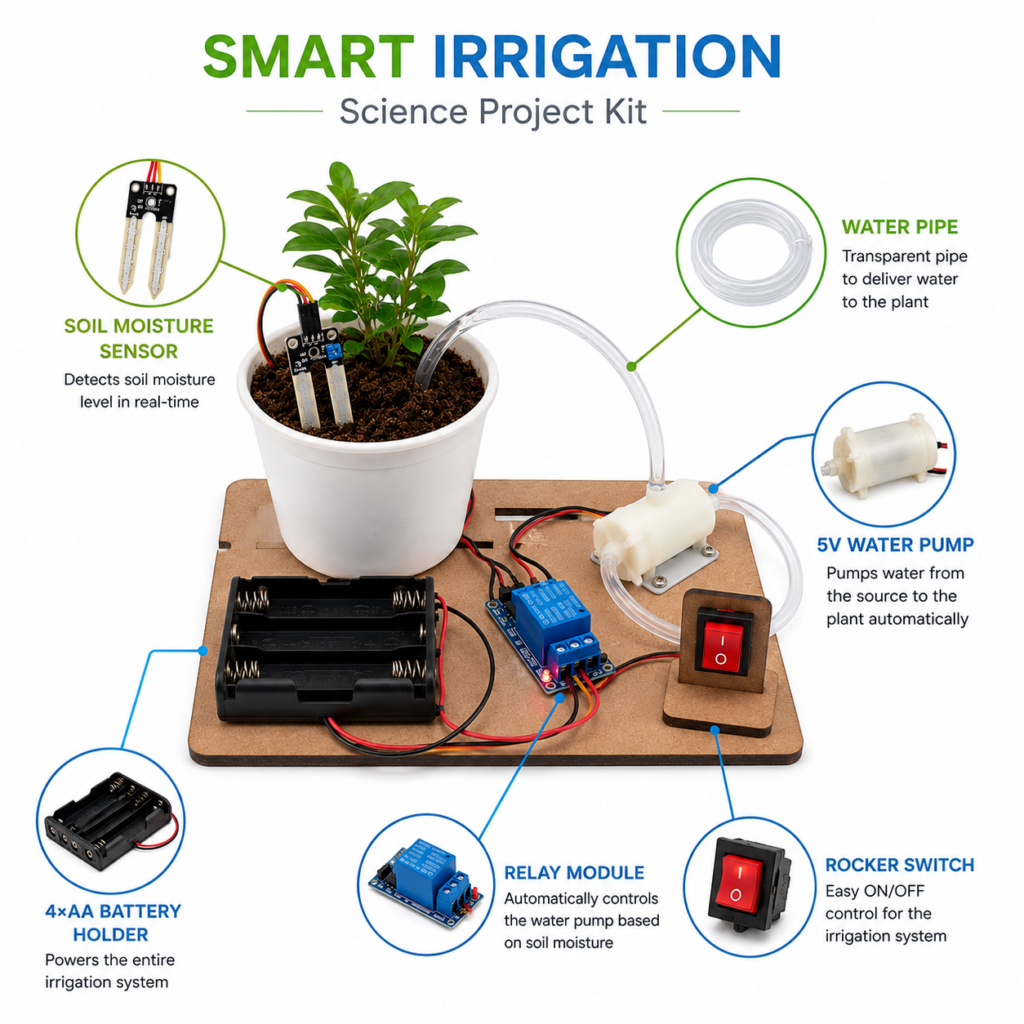
Have you ever forgotten to water a plant? In this project, you will build a Smart Irrigation System that waters a plant by itself whenever the soil gets too dry.
You do not need to write any code. The soil moisture sensor module has a small built-in “decision maker” that checks whether the soil is wet or dry. It tells a relay (an electrically controlled switch) to turn a water pump ON or OFF.
How it works
- Soil moisture sensorchecks the soil
- Relayswitches the pump
- Water pumpmoves the water
- Plantgets watered
- Dry soil: the sensor signals the relay, the pump turns ON, and water reaches the plant.
- Wet soil: the sensor signals the relay, the pump turns OFF.
The big idea: Sense, Decide, Act
The sensor senses the soil, the module decides if it is too dry, and the pump acts by giving water.
2. What you need
| No. | Component | Qty. | What it does |
|---|---|---|---|
| 1 | Soil moisture sensor (probe + module) | 1 | Checks how wet the soil is |
| 2 | 1-channel relay module (5V) | 1 | Works as an automatic switch |
| 3 | Mini DC water pump (5V) | 1 | Pumps water |
| 4 | 5V DC power supply | 1 | Powers the whole project |
| 5 | Water tube | 1 | Carries water to the plant |
| 6 | Water container | 1 | Stores water |
| 7 | Plant pot with soil | 1 | For demonstration |
| 8 | Jumper wires | As needed | Connections |
| 9 | Small screwdriver | 1 | Adjusting the sensor |
Important
Always check the voltage printed on your pump. This guide assumes a 5V pump. A pump with a different voltage needs its own matching power supply.
3. Meet the soil moisture sensor
The sensor has two parts.
A. The probe. This is the fork-shaped part that goes into the soil. Wet soil carries electricity better than dry soil, and the probe uses this to measure moisture.
B. The module. This small circuit board reads the probe and makes the decision. It has these pins and parts:
| Pin / part | Name | What it does |
|---|---|---|
| VCC | Power (+) | Connects to 5V positive |
| GND | Ground (−) | Connects to 5V negative |
| DO | Digital output | Gives a HIGH or LOW signal: dry or wet |
| AO | Analog output | Not used in this project |
| Blue box with a screw | Potentiometer | Sets how dry the soil must be before the pump starts |
| LEDs | Indicators | Show power and output status |
We use only DO. It sends a simple ON/OFF-style signal that the relay understands.
4. Meet the relay
A relay lets a small signal control a larger device, like our pump. Think of it as a light switch that flips by itself when it receives a signal.
Control side (the signal)
| Pin | Connects to |
|---|---|
| VCC | 5V positive |
| GND | 5V negative |
| IN | Sensor DO pin |
Switch side (the pump): COM, NO and NC
| Terminal | Full name | Meaning |
|---|---|---|
| COM | Common | The middle terminal of the switch |
| NO | Normally Open | Not connected to COM when the relay is resting. Connected when the relay is activated |
| NC | Normally Closed | Connected to COM when the relay is resting. Disconnected when the relay is activated |
Relay resting (OFF):        Relay activated (ON):

COM ── X ── NO              COM ────── NO
COM ────── NC               COM ── X ── NC
5. Why do we need a relay?
A sensor can only send a very tiny signal. It cannot supply enough power to run a pump. The relay bridges the gap: the small signal from the sensor flips the switch, and the switch lets the full power flow to the pump.
Sensor (small signal) → Relay (switch) → Pump (big power)
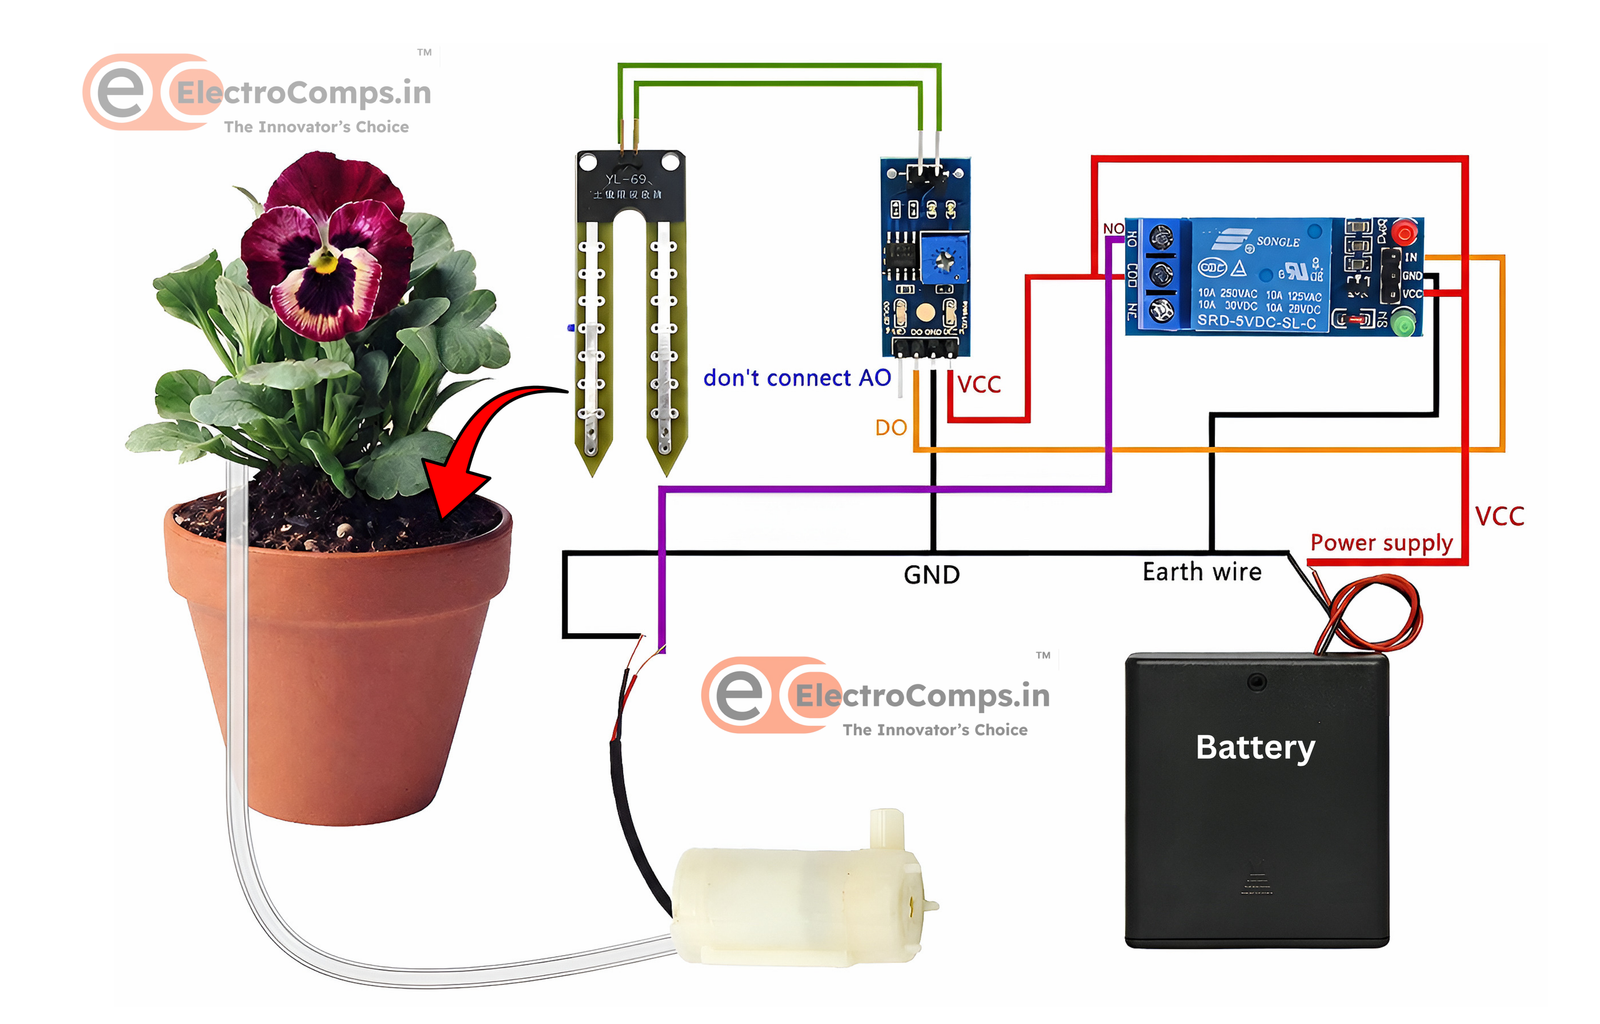
6. Wiring diagram
7. Step-by-step assembly
- Prepare the plant. Fill a small pot with soil. Push only the probe into the soil. Keep the electronic module out of the soil and away from water.
- Connect the probe to the module using the cable that comes with the sensor.
- Wire the sensor. Connect VCC to 5V (+) and GND to 5V (−). Leave DO for the next step.
- Wire the relay. Connect VCC to 5V (+) and GND to 5V (−). Then connect the sensor’s DO to the relay’s IN.
- Prepare the pump. Place the pump in the water container. Attach the tube to the pump outlet and place the other end near the plant. Make sure the tube is not bent or blocked.
- Wire the pump through the relay.
- 5V (+) to COM
- NO to Pump (+)
- Pump (−) to 5V (−)
- Switch on the power and test.
8. Testing and setting up
Test 1: Does the pump work when the soil is dry?
Power the system with the probe in dry soil or in the air. The pump should turn ON.
Pump is OFF when the soil is dry?
Some relay modules work in reverse (“active LOW”). Switch off the power and move the pump wire from NO to NC. Then try again. The pump should now run in dry soil and stop in wet soil.
Test 2: Does the pump stop when the soil is wet?
Slowly add water to the soil, or dip the probe into a glass of water. The pump should turn OFF.
Setting the sensitivity
The small screw on the blue potentiometer decides how dry the soil should be before the pump starts.
- Put the probe in soil that is as moist as you want it to be.
- Slowly turn the screw with a small screwdriver.
- Stop at the point where the sensor’s output LED changes. That is your “wet enough” level.
- Test again with dry and wet soil, and fine-tune if needed.
Every sensor and soil type is slightly different, so always set this using your own sensor instead of copying someone else’s setting.
9. Troubleshooting
| Problem | What to check |
|---|---|
| Nothing works | Is the power supply on? Are VCC and GND connected on both the sensor and the relay? |
| Relay does not click | Check the relay’s VCC, GND and IN wires. Check that DO is connected to IN. |
| Relay clicks but the pump does not run | Check COM, NO and the pump wires. Check the pump power supply and test the pump on its own. |
| Pump runs in wet soil and stops in dry soil | The logic is reversed. Move the pump wire between NO and NC. |
| Pump is always ON or always OFF | Adjust the potentiometer. Check that the probe is properly in the soil and the cable is secure. |
| Pump keeps switching on and off rapidly | The soil is near the threshold. Adjust the screw slightly, or let the water soak in before the next reading. |
| Sensor seems unreliable | Check for loose wires. Old or corroded probes wear out and may need replacing. |
10. Safety rules
Please follow these rules
- Use only low-voltage DC (5V) power for this project.
- Never connect mains electricity (wall socket AC) to the relay.
- Keep water away from the sensor module, relay and wires.
- Never touch electrical parts with wet hands.
- Switch off the power before changing any wiring.
- Place the water container where it cannot spill onto the electronics.
- Ask a teacher or an adult to check your circuit before switching on.
11. What you will learn
- Agriculture: how soil moisture affects plants
- Electronics: sensors, switches and relays
- Circuits: control signals and power circuits
- Water saving: giving water only when needed
- Automation: turning a manual job into an automatic one
12. Conclusion
In this project, you built an automatic watering system using only a sensor, a relay and a pump. The sensor checks the soil, the relay acts as the switch, and the pump waters the plant when needed.
Wet soil: pump OFF, water is saved
Sense, Decide, Act. This is the same idea used in real farms, greenhouses and smart homes around the world.