⚡ TECHWAVE 2026 • Up to 40% OFF on Electronics & DIY Kits SHOP NOW →
✦ PROJECT DAYS • Build More. Save More. Exclusive Festive Deals EXPLORE →
⚙ POWER UP SALE • Special Prices on Components & Robotics Limited Time SHOP DEALS →
✦ MAKER FEST • Everything You Need to Build Something Amazing Special Offers START BUILDING →

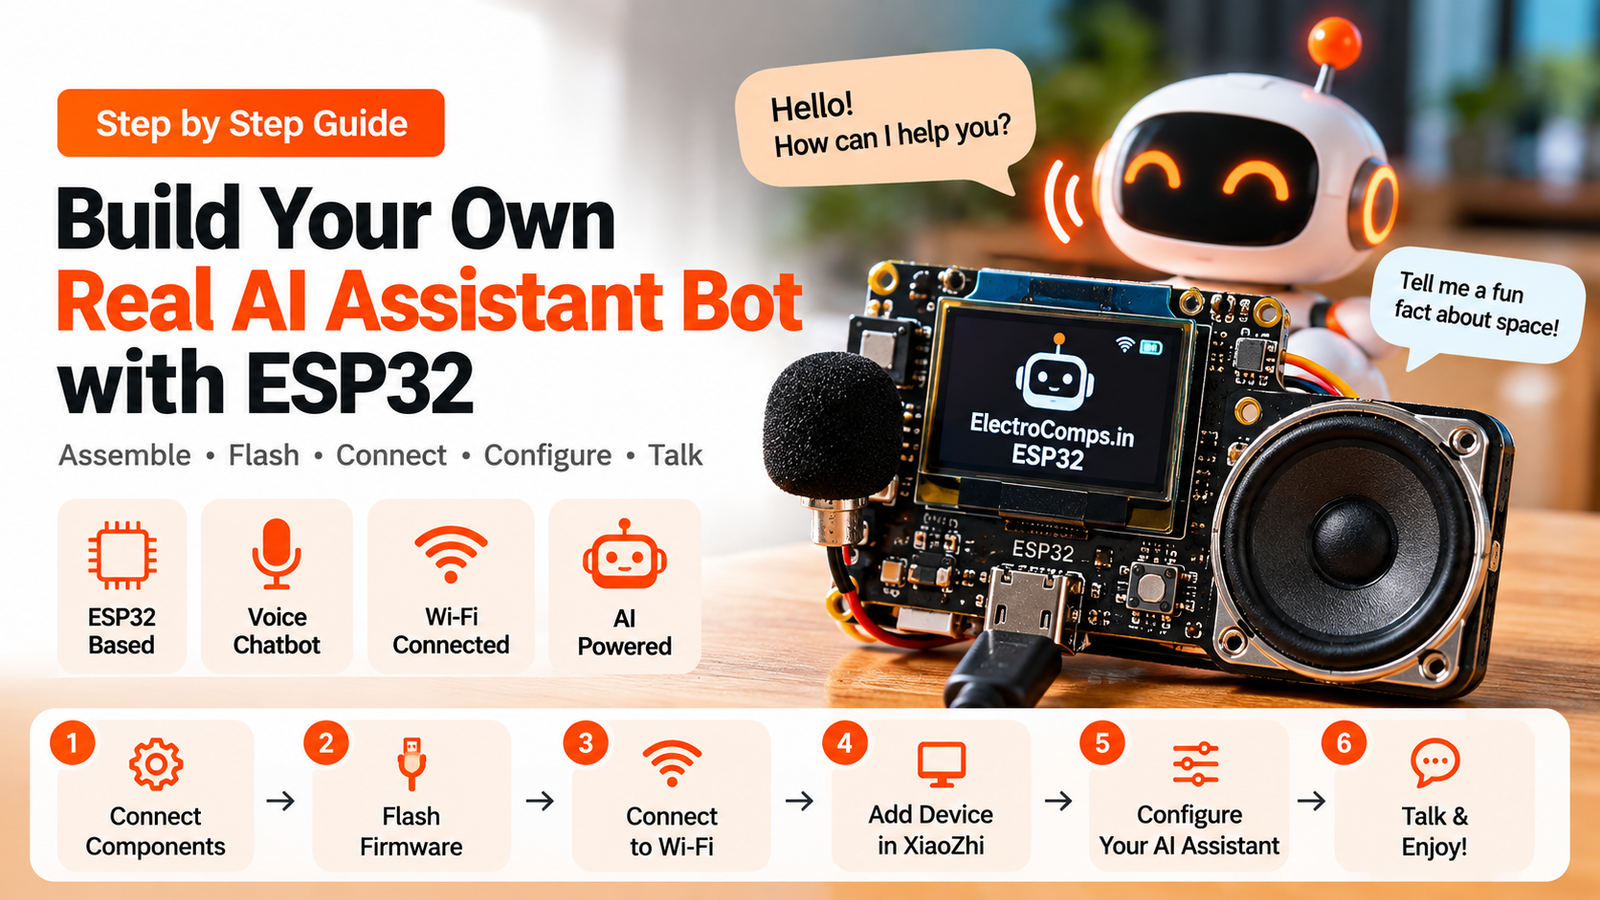
Build Your own real AI Assistant Bot with Esp32, microphone, speaker, and the XiaoZhi AI platform. Follow the steps below carefully to assemble the hardware, install the firmware, connect the ESP32 to the internet, and configure your AI assistant.
Contents
The complete process involves:
- Connecting the hardware
- Flashing the firmware
- Connecting the ESP32 to Wi-Fi
- Registering the device with XiaoZhi
- Configuring your AI assistant
- Testing your voice chatbot
Step 1: Connect the Components
First, assemble the ESP32 AI Voice Chatbot according to the provided circuit diagram.
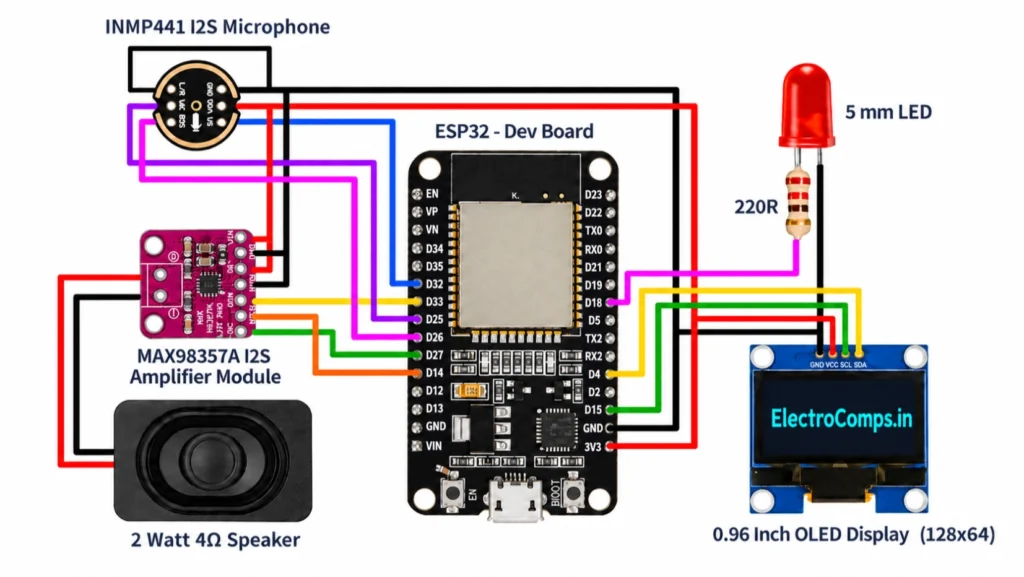
Connect all components exactly as shown in the circuit diagram.
Pay special attention to:
- ESP32 power connections
- Microphone connections
- Speaker/audio connections
- OLED display connections
- GND connections
- 5V/3.3V power connections
⚠️ Important: Check every connection carefully before connecting the ESP32 to your computer or power supply. Incorrect wiring can damage the components.
Step 2: Check the Circuit
Before powering the circuit:
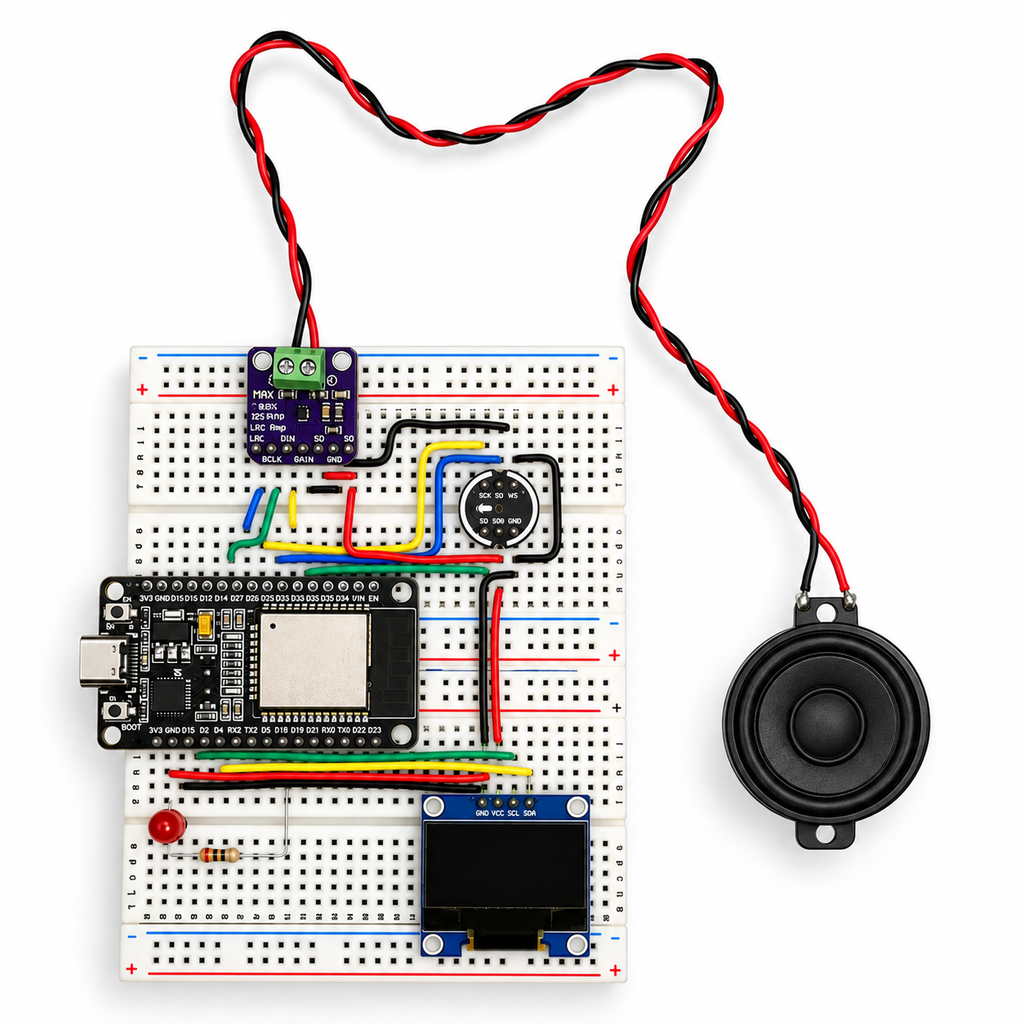
Check the following:
- Are all wires connected to the correct pins?
- Is GND connected correctly?
- Are the power and signal wires in the correct locations?
- Are there any loose wires?
- Are there any short circuits?
Once you have verified the circuit, connect the ESP32 to your computer using a USB data cable.
Tip: Some USB cables are designed only for charging and cannot transfer data. If your computer does not detect the ESP32, try another USB cable.
Step 3: Flash the Firmware
Once the hardware is connected correctly, Click on ElectroComps.in Firmware Flasher Given Below.
Click:
⚡ Flash Firmware
ElectroComps.in Firmware Flasher
Connect your ESP32 board via USB and install the firmware directly from your browser.
✓
ESP32 Compatible
•
✓
Chrome / Edge
A small installation window will appear in your browser.
Step 4: Select the ESP32 COM Port
The browser will ask you to select the serial port connected to your ESP32.
Select the COM port corresponding to your ESP32.
For example:
COM3
COM5
COM7
The actual COM number may be different on your computer.
If the ESP32 COM port is not visible:
Check:
- USB cable
- USB connection
- ESP32 power
- USB drivers
- Windows Device Manager
Then disconnect and reconnect the ESP32 and try again.
Step 5: Connect to the ESP32
After selecting the correct COM port:
- Select the ESP32 port.
- Click Connect.
The browser will establish a connection with your ESP32.
Step 6: Erase Existing Data and Install Firmware
The installer may provide an option to erase the existing data on the ESP32.
Select:
Erase Device / Erase Existing Data
Then click:
Install
The firmware installation will begin.
Depending on your computer, USB connection, and firmware size, the process may take approximately 1–3 minutes.
Do not:
- Disconnect the USB cable
- Close the browser
- Turn off the ESP32
- Refresh the webpage
while the firmware is being installed.
Step 7: Installation Completed
After the firmware has been successfully installed, the browser will display a message such as:
Congratulations! Installation successful.
You can now close the installation window by clicking the X or Exit button.
The ESP32 will automatically restart.
Step 8: Connect the ESP32 to Your Wi-Fi
After restarting, the ESP32 will temporarily work as a Wi-Fi hotspot/access point.
This allows you to provide your Wi-Fi network details to the ESP32.
Open the Wi-Fi settings on your:
- Laptop
- Desktop with Wi-Fi
- Smartphone
- Tablet
Look for the Wi-Fi network created by the ESP32.
It may appear similar to:
Xiaozhi-5919
The exact number may be different for your device.
Select the ESP32 hotspot and connect to it.
Step 9: Open the ESP32 Configuration Page
Once your computer or phone is connected to the ESP32 hotspot, open a web browser.
Enter:
192.168.4.1
Press Enter.
The ESP32 configuration page should open.
You will see an option to configure your Wi-Fi connection.
Step 10: Configure Your Wi-Fi
On the configuration page:
- Select your available Wi-Fi network.
- Enter the Wi-Fi password.
- Confirm the details.
- Click Connect / Save.
The ESP32 will now connect to your Wi-Fi network.
Once connected, the ESP32 will be able to communicate with the XiaoZhi AI server through the internet.
💡 Recommended for School Projects
If you are demonstrating this project at a school, exhibition, science fair, or another location where the Wi-Fi network may change, it is convenient to use a portable mobile hotspot.
For example:
Mobile Hotspot
      ↓
    ESP32
      ↓
Internet
      ↓
XiaoZhi AI Server
This makes the project easier to demonstrate in different locations.
Tip: Make sure the mobile hotspot has a stable internet connection and remains turned on while demonstrating the project.
Step 11: Open the XiaoZhi Console
Once the ESP32 has successfully connected to the internet, open the XiaoZhi Console in your web browser.
Log in to your XiaoZhi account.
If you don’t already have an account, create one.
Using an available social login such as GitHub can make account management easier.
Step 12: Add Your ESP32 Device
After logging in:
- Open the Agents section.
- Select Add Device.
- Look at the OLED display on your ESP32.
- Find the 6-digit verification/pairing code displayed by the device ESP32Enter that code in the XiaoZhi console.
- Confirm the device.
Your ESP32 should now be associated with your XiaoZhi account.
Step 13: Configure Your AI Assistant
Once your ESP32 is connected to XiaoZhi, you can customize your AI assistant according to your requirements.
Depending on the available options, you can configure things such as:
AI Voice
Choose the voice you want your assistant to use.
Language
Select the language you want your AI assistant to communicate in.
For example:
- English
- Hindi
- Other supported languages
Assistant Name
Give your AI assistant a name.
Self Introduction
Configure what the AI assistant should say when it introduces itself.
You can create an introduction such as:
“Hello! I am your ElectroComps AI Assistant.”
You can customize the personality and behavior according to your project requirements.
Step 14: Test Your AI Voice Chatbot
Your ESP32 AI Voice Chatbot is now ready.
Try speaking to the microphone.
For example:
“Hello, who are you?”
The ESP32 will capture your voice, send the required information through the internet, and provide an AI-generated response through the speaker.
Test different questions and commands to verify that:
- The microphone works correctly.
- The speaker produces clear audio.
- The OLED display works correctly.
- The ESP32 remains connected to Wi-Fi.
- The AI responds correctly.
🎉 Your AI Voice Chatbot Is Ready!
Congratulations!
You have successfully built an ESP32-based AI Voice Chatbot using the XiaoZhi platform.
Important Safety & Troubleshooting Tips
ESP32 is not detected
Try:
- A different USB cable
- Another USB port
- Reconnecting the ESP32
- Checking Windows Device Manager
- Installing the required USB-to-serial driver
Wi-Fi hotspot is not appearing
Restart the ESP32 and wait a few seconds. Then check the available Wi-Fi networks again.
192.168.4.1 does not open
Make sure your phone or computer is connected to the ESP32’s Wi-Fi hotspot, not your normal home Wi-Fi.
AI is not responding
Check:
- Internet connectivity
- Wi-Fi credentials
- XiaoZhi account/device registration
- Device pairing code
- Microphone wiring
- Speaker wiring
No sound
Check the speaker wiring, amplifier/audio connections, power supply, and volume configuration.
Project Complete
You have now created a complete ESP32-based AI Voice Chatbot that combines electronics, embedded programming, Wi-Fi connectivity, cloud AI, speech interaction, and hardware design.
This project is suitable for students, STEM workshops, robotics demonstrations, science exhibitions, and makers.