⚡ TECHWAVE 2026 • Up to 40% OFF on Electronics & DIY Kits SHOP NOW →
✦ PROJECT DAYS • Build More. Save More. Exclusive Festive Deals EXPLORE →
⚙ POWER UP SALE • Special Prices on Components & Robotics Limited Time SHOP DEALS →
✦ MAKER FEST • Everything You Need to Build Something Amazing Special Offers START BUILDING →

Welcome to the world of the Internet of Things (IoT)!
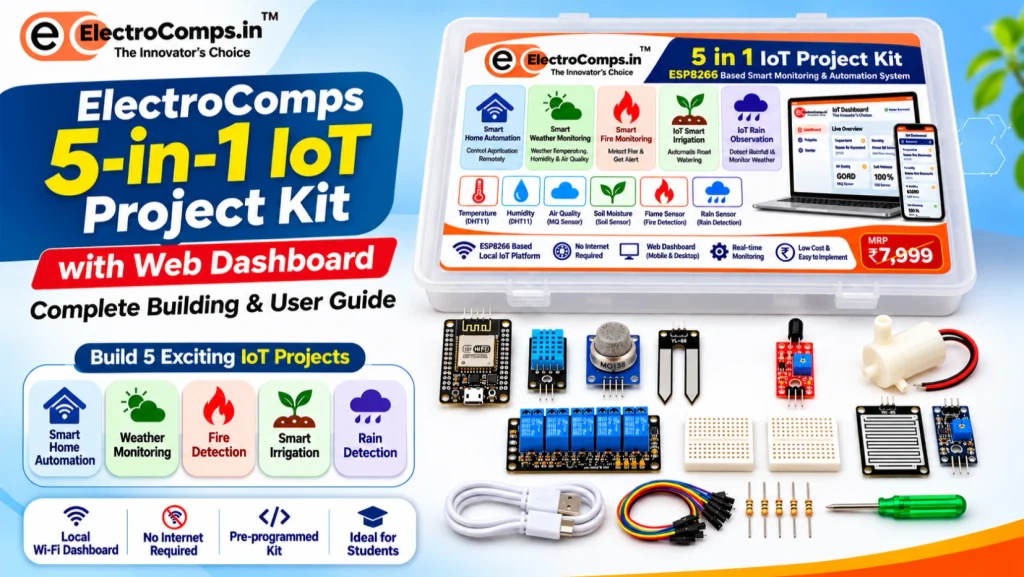
The ElectroComps 5-in-1 IoT Project Kit is a hands-on electronics learning kit designed for school students, STEM enthusiasts, and beginners who want to explore smart technology through practical experiments.
Powered by the NodeMCU ESP8266 Wi-Fi development board, this kit allows you to build five exciting IoT applications using a single hardware platform.
The kit comes with pre-programmed firmware and an integrated web dashboard. You don’t need to install any software or write any code to get started.
Simply assemble the components, power ON the controller, connect your smartphone to the kit’s Wi-Fi network, and access your dashboard!
No internet connection is required. No additional software installation is required.
What Can You Build with This 5-in-1 IoT Kit?
Explore five practical IoT applications:
- Smart Home Automation System
- Smart Weather Monitoring Station
- Automatic Fire Detection System
- Smart Irrigation Monitoring and Control
- Rain Detection System
All five projects operate using one NodeMCU ESP8266 controller and an integrated local web dashboard.
Components Included in the Project
| Component | Purpose |
|---|---|
| NodeMCU ESP8266 CH340 | Main Wi-Fi controller |
| DHT11 Sensor | Temperature and humidity monitoring |
| MQ Gas Sensor | Air-quality indication |
| Soil Moisture Sensor | Soil condition detection |
| Rain Sensor Module | Rain detection |
| Flame Sensor Module | Flame detection |
| 4-Channel Relay Module | Appliance switching |
| DC Water Pump | Irrigation demonstration |
| Jumper Wires | Circuit connections |
| Breadboard | Circuit assembly |
| USB Cable | Power supply |
1. Smart Home Automation System
Control four electrical appliances using your smartphone!
The project uses a four-channel relay module connected to the NodeMCU ESP8266.
Features:
- Independently control four relay channels.
- Turn appliances ON or OFF.
- Turn all four channels ON simultaneously.
- Turn all four channels OFF simultaneously.
- Monitor relay status through the dashboard.
Working principle:
When you operate a switch on the dashboard, a command is sent through the local Wi-Fi network to the NodeMCU. The controller processes the command and activates or deactivates the corresponding relay.
2. Smart Weather Monitoring Station
Build your own environmental monitoring station!
This project uses a DHT11 temperature and humidity sensor and an MQ gas sensor.
Features:
- Live temperature monitoring in °C.
- Relative humidity monitoring.
- Air-quality indication.
- Live readings on the web dashboard.
Working principle:
The DHT11 measures surrounding temperature and humidity. The MQ sensor provides an analog reading that the ESP8266 uses to display an indicative air-quality category.
The dashboard displays four categories:
- GOOD
- MODERATE
- POOR
- HIGH
Note: These are educational demonstration categories based on raw sensor readings, not calibrated AQI measurements.
3. Automatic Fire Detection System
Learn how sensors can be used to detect potential fire hazards.
This project uses a flame sensor connected to the NodeMCU.
Features:
- Detect flames using the flame sensor.
- Display flame detection status.
- Show safety warnings on the dashboard.
- Monitor sensor status in real time.
Working principle:
The flame sensor detects infrared radiation associated with flames and generates a digital signal.
When a flame is detected, the dashboard displays FLAME DETECTED.
When no flame is detected, it displays NO FLAME.
This is an educational demonstration, not a certified fire alarm or life-safety system.
4. Smart Irrigation Monitoring and Control
Explore how IoT technology can help in smart agriculture.
This project uses a soil moisture sensor and a relay-controlled DC water pump.
Features:
- Monitor soil conditions.
- Display soil status on the dashboard.
- Control the water pump using a relay.
- Turn the pump ON or OFF remotely.
Working principle:
The soil moisture sensor provides a digital output based on the adjustable moisture threshold.
The dashboard displays 0% or 100% according to the digital sensor state. These values indicate dry/wet threshold states rather than calibrated moisture percentages.
The water pump is connected through relay channel 4.
5. Rain Detection System
Build a simple rain detection application.
This project uses a rain sensor module to detect water droplets on its sensing plate.
Features:
- Detect rainfall or water droplets.
- Display rain detection status.
- Show warnings when rain is detected.
- Monitor the rain sensor through the dashboard.
Working principle:
The rain sensor generates a digital signal depending on the water detected on its sensing plate.
When rain is detected, the dashboard displays RAIN DETECTED.
When the sensing plate is dry, the dashboard displays NO RAIN.
Step-by-Step Project Building Instructions
Follow these instructions to assemble and operate your ElectroComps 5-in-1 IoT Project Kit.
Edit this project interactively in Cirkit Designer.
Step 1: Understand the Main Controller
The NodeMCU ESP8266 is the main controller of this project.
It provides:
- Wi-Fi connectivity.
- Digital input and output pins.
- Analog input.
- Microcontroller-based processing.
- Built-in support for the web dashboard.
Important: Your NodeMCU comes pre-programmed with ElectroComps IoT firmware. There is no need to install Arduino IDE or upload any additional code.
Step 2: Connect the Sensors
Connect the sensors according to the following pin configuration.
| Sensor / Module | NodeMCU Pin |
|---|---|
| MQ Sensor AO | A0 |
| Soil Sensor DO | D3 |
| Rain Sensor DO | D4 |
| Flame Sensor DO | D0 |
| DHT11 DATA | D7 |
Connect VCC and GND according to the operating-voltage requirements of each module.
Important technical information:
- The ESP8266 has only one analog input.
- The MQ sensor uses A0.
- The soil and rain sensors use their digital outputs (DO).
- No analog multiplexer is required.
- Never apply 5V directly to ESP8266 GPIO pins.
- Check the NodeMCU board’s A0 input range before connecting MQ sensor AO.
Step 3: Connect the 4-Channel Relay Module
The relay module allows you to control four independent output channels.
Follow this pin configuration:
| Relay Module | NodeMCU Pin |
|---|---|
| IN1 | D1 |
| IN2 | D2 |
| IN3 | D5 |
| IN4 | D6 |
Relay channel 4 is assigned to the irrigation water pump.
The supplied firmware uses active-LOW relay logic:
- LOW = Relay ON
- HIGH = Relay OFF
Check all power and signal connections before switching ON the circuit.
Safety: For student demonstrations, use low-voltage DC loads. Do not connect exposed household mains wiring to a breadboard or student-built circuit. Mains-powered appliances require suitable enclosed equipment and qualified installation.
Step 4: Assemble the Complete Circuit
Now connect all the components according to the pin configuration.
Follow this order:
- Place the NodeMCU ESP8266 on the breadboard.
- Connect the DHT11 sensor.
- Connect the MQ gas sensor.
- Connect the soil moisture sensor.
- Connect the rain sensor.
- Connect the flame sensor.
- Connect the four-channel relay module.
- Connect the DC water pump to the appropriate relay-controlled low-voltage circuit.
- Double-check all VCC, GND and signal connections.
Keep the electronic components protected from water.
Step 5: Power ON the IoT Controller
Your NodeMCU comes with the required firmware already installed.
Connect the USB cable to the NodeMCU and a suitable USB power source.
After powering ON:
- The NodeMCU starts automatically.
- Its Wi-Fi access point becomes available.
- The integrated web server starts.
- Sensor readings begin updating.
No computer or programming software is needed for normal operation.
Step 6: Connect to the ElectroComps Wi-Fi Network
Open Wi-Fi settings on your smartphone, tablet or laptop.
Search for the following network:
| Setting | Details |
|---|---|
| Wi-Fi Name | ElectroComps-IoT |
| Password | ElectroComps123 |
| IP Address | 192.168.4.1 |
Select ElectroComps-IoT and enter the password.
Your phone may display a warning saying that the Wi-Fi network has no internet access.
This is completely normal.
The NodeMCU creates its own local Wi-Fi network, so you can operate the dashboard without mobile data or an internet connection.
Keep your phone connected to this Wi-Fi network.
Step 7: Open the IoT Web Dashboard
Open Google Chrome or any modern web browser.
Enter this address:
Press Enter.
The ElectroComps.in IoT dashboard will appear.
You can now access all five IoT projects from your smartphone or computer.
Step 8: Explore the Dashboard
The dashboard contains three main sections.
Dashboard
Displays a live overview of:
- Temperature.
- Humidity.
- Air quality.
- Soil moisture.
It also provides shortcuts to all five projects.
Projects
Select any project to access its dedicated monitoring and control interface.
Device Information
Displays:
- Device connection status.
- Wi-Fi network name.
- IP address.
- Connected clients.
- Device uptime.
- Available memory.
The dashboard automatically refreshes sensor information approximately every second.
Step 9: Test All Five IoT Projects
Now it’s time to experiment!
A. Smart Home Automation
- Open Smart Home Automation.
- Turn ON Relay 1.
- Check whether the connected low-voltage load activates.
- Repeat for all four relay channels.
- Test Turn All ON.
- Test Turn All OFF.
B. Smart Weather Monitoring
- Open Smart Weather Monitoring.
- Observe the temperature reading.
- Observe the humidity reading.
- Allow the MQ sensor to warm up according to its manufacturer’s instructions.
- Observe the displayed air-quality category.
C. Automatic Fire Detection
- Open Automatic Fire Detection.
- Observe the flame sensor status.
- Test it using a safe, controlled demonstration under adult supervision.
- Check whether the dashboard displays FLAME DETECTED.
Never use an uncontrolled flame or expose the electronics to fire.
D. Smart Irrigation
- Open Smart Irrigation Control.
- Place the soil moisture sensor in dry soil.
- Observe the dashboard.
- Test again using moist soil.
- Observe the digital threshold response.
- Operate the water pump using the Relay 4 switch.
E. Rain Detection
- Open Rain Detection.
- Place a few water droplets on the rain sensor plate.
- Observe the dashboard.
- Dry the sensor plate.
- Verify the NO RAIN status.
Keep water away from the NodeMCU, relay module and other electronic circuits.
Troubleshooting Guide
If your project is not working correctly, follow these instructions.
Problem 1: NodeMCU is not powering ON
Possible reasons:
- USB cable is damaged.
- USB power source is insufficient.
- Loose power connections.
Solutions:
- Check the USB cable.
- Try another USB power source.
- Inspect the USB connector.
- Check the power indicator on the NodeMCU.
Problem 2: ElectroComps-IoT Wi-Fi network is not visible
Possible reasons:
- NodeMCU is not receiving stable power.
- The controller has not completed startup.
- Sensor connections are affecting ESP8266 startup.
Solutions:
- Disconnect power.
- Check all sensor connections.
- Pay special attention to D3 and D4 connections.
- Restart the NodeMCU.
- Wait a few seconds and scan for the Wi-Fi network again.
Problem 3: Dashboard is not opening
Solutions:
- Connect your smartphone to ElectroComps-IoT.
- Make sure your phone remains connected even though the network has no internet.
- Open Chrome.
- Enter http://192.168.4.1.
- If necessary, disable automatic switching to mobile data.
- Try another browser.
Problem 4: DHT11 displays Sensor Not Connected
Possible reasons:
- Loose DATA connection.
- Incorrect power connection.
- Damaged sensor.
Solutions:
- Check the DHT11 DATA wire connected to D7.
- Check VCC and GND.
- Ensure the sensor is firmly connected.
- Restart the NodeMCU.
Problem 5: MQ sensor displays Sensor Not Connected
Possible reasons:
- Sensor is not receiving power.
- AO wire is disconnected.
- Analog reading is zero.
Solutions:
- Check the MQ sensor power connection.
- Verify AO is connected to A0.
- Check voltage compatibility.
- Allow the MQ sensor to warm up.
The firmware treats an averaged analog reading of zero as disconnected.
Problem 6: Soil moisture reading is incorrect
Possible reasons:
- Incorrect DO connection.
- Sensor threshold needs adjustment.
- Loose jumper wire.
Solutions:
- Check the sensor power supply.
- Verify DO is connected to D3.
- Adjust the onboard potentiometer.
- Observe the sensor indicator LED.
- Test using dry and moist soil.
The supplied firmware uses digital threshold detection rather than continuous analog moisture measurement.
Problem 7: Rain sensor is not detecting water
Solutions:
- Check the sensor power connection.
- Verify DO is connected to D4.
- Inspect the onboard indicator LED.
- Adjust the potentiometer.
- Clean and dry the sensing plate before testing again.
Problem 8: Flame sensor is showing the wrong status
Solutions:
- Check the DO connection to D0.
- Verify VCC and GND.
- Inspect the sensor indicator LED.
- Check whether the sensor’s sensitivity needs adjustment.
Problem 9: Relay is not switching
Possible reasons:
- Loose IN connection.
- Incorrect relay power supply.
- Relay module is not receiving a proper control signal.
Solutions:
- Check IN1, IN2, IN3 and IN4 connections.
- Verify relay module power.
- Check the relay indicator LEDs.
- Restart the controller.
- Test each channel individually using the dashboard.
Problem 10: NodeMCU is not starting after sensor connections
D3 (GPIO0) and D4 (GPIO2) are ESP8266 boot-configuration pins.
If a connected sensor holds either pin LOW during startup, the controller may fail to boot.
Solutions:
- Disconnect power.
- Temporarily disconnect the soil and rain sensor signal wires.
- Restart the NodeMCU.
- If it starts normally, check the sensor output levels and wiring.
- Verify compatibility before reconnecting.
If the problem continues, contact ElectroComps support for assistance rather than modifying the pre-installed firmware.
Important Technical and Safety Notes
- The ESP8266 GPIO pins operate at 3.3V logic.
- Never apply 5V directly to GPIO pins.
- Check the NodeMCU board’s A0 input voltage range before connecting MQ AO.
- The soil and rain sensors use digital outputs in this project.
- Use a suitable external power supply for the pump and relay loads.
- Maintain correct grounding and power connections.
- D3 and D4 require special attention during startup.
- Keep water away from electronic control boards.
- Do not use this educational kit as a certified fire or safety monitoring system.
Learning Outcomes for Students
By completing the ElectroComps 5-in-1 IoT Project Kit, students can understand:
- Basics of the Internet of Things.
- ESP8266 microcontroller applications.
- Sensor interfacing.
- Analog and digital signals.
- Wi-Fi communication.
- Web-based device control.
- Smart home automation.
- Environmental monitoring.
- Smart agriculture applications.
- Real-world problem-solving through electronics.
Frequently Asked Questions (FAQs)
1. Is the NodeMCU already programmed?
Yes. The NodeMCU comes pre-programmed with ElectroComps IoT firmware. No additional programming is required for normal operation.
2. Do I need Arduino IDE?
No. You do not need Arduino IDE, additional libraries or a computer to operate the project.
3. Does the project require an internet connection?
No. The NodeMCU creates its own local Wi-Fi network, and the dashboard works without internet access.
4. Can I operate the project using my smartphone?
Yes. Connect your smartphone to ElectroComps-IoT and open http://192.168.4.1 in your browser.
5. Can I control four appliances?
Yes. The four-channel relay module supports independent control of four relay outputs.
6. Can beginners build this project?
Yes. The kit is designed for school students and beginners interested in electronics, robotics and IoT.
7. Can I use this kit for school science exhibitions?
Yes. It is suitable for STEM activities, science exhibitions, demonstrations and educational projects.
8. Does the dashboard work on Android and Windows?
Yes. The dashboard can be accessed through a modern web browser on smartphones, tablets and computers connected to the ESP8266 Wi-Fi network.
Conclusion
The ElectroComps 5-in-1 IoT Project Kit offers an exciting opportunity for students to explore connected technology through practical learning.
From smart home automation to environmental monitoring and smart agriculture, students can experiment with five different IoT applications using a single hardware platform.
With pre-installed firmware and an integrated web dashboard, getting started is simple.
Assemble. Connect. Explore. Innovate.
ElectroComps.in – The Innovator’s Choice
Explore more electronics, robotics and STEM learning products at ElectroComps.in.